Ubuntu X Window issue memo

ubuntu-header-img1
Working with Linux is sometime painful to encounter the issue like below. All of a sudden, you cannot login and got the error screen… If you cannot fix it, you need to re-install the system.
low-graphic-err-linux-msg1
I have encountered this problem with my Ubuntu 14.04 (without the disappointed face icons) and this is how I got over the problem.

Step 1: Press Ctrl + Alt + f1 key to get in command mode
Step 2: Re-install the graphic drivers
Step 3: Restart the system

I have tried some methods in Step 2 but following didn’t work for my laptop probably because of its Intel Graphic driver.

Drivers for Nvidia or AMD/ATI
Nvidia:

sudo apt-get install nvidia-current

AMD/ATI:

sudo apt-get install fglrx

This method finally worked, even though, login screen looking has little changed

Intel HD Graphics:

sudo apt-get install gdm
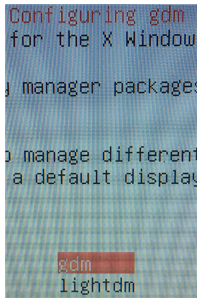
gmd-config-200x300
The solutions depends on the system, and this is for Intel HD Graphics.

During the install, you will be prompted to select Display Manager (DM). At this point, I choose “GDM” instead of lightDM (default for Ubuntu 14.04).

Ubuntu default login screen is lightDM, and GNOME is GDM. According to some resource, lightDM doesn’t work well in SSD. (Mine laptop is SSD). Therefore, GDM seems to be better for SSD.

sudo apt-get install numlockx
sudo leafpad /etc/lightdm/lightdm.conf

In my case, the error occur after installing numlockx to enable ten-key. The command above, and adding the following line at the end of “lightdm.conf”

greeter-setup-script=/usr/bin/numlockx on

The numlockx edit lightdm.conf that change the configuration for LightDM. This is probably why I got this error.. 🙁

Updated at 2016/01/19:
This error also occur my Lubuntu with the CPU, AMD Dual-Core E1-6015, and installing gdm also fixed the problem as Ubuntu run on Intel Core i7.

Linux Optimization Memo

linux-optimization-header1
Download following software

$ sudo apt-get install leafpad
$ sudo apt-get install gksu
$ sudo apt-get install Lxkeymap
$ sudo apt-get install inxi

GParted is helpful software especially using via installing devices (CD, DVD, USB memory):

$ sudo apt-get install gparted

Add getdeb repository:

wget -q -O - http://archive.getdeb.net/getdeb-archive.key | sudo apt-key add -
sudo sh -c 'echo "deb http://archive.getdeb.net/ubuntu wily-getdeb apps" >> /etc/apt/sources.list.d/getdeb.list'

Installing Wine 1.8:

sudo add-apt-repository ppa:ubuntu-wine/ppa
sudo apt-get update
sudo apt-get install wine1.8 winetricks
sudo dpkg --add-architecture i386
sudo add-apt-repository ppa:wine/wine-builds
sudo apt-get update
sudo apt-get install --install-recommends winehq-devel

Shutter is the capable screenshot software for Ubuntu

sudo add-apt-repository -y ppa:shutter/ppa
sudo apt-get update
sudo apt-get install shutter

Creating dual boot Windows 10 and Linux Mint

dualboot-heaer-img1
STEP1: Creating unmounted partition in HDD/SSD:
There is a famous tool for Linux such as GParted, or 3rd party software is also available


STEP2: Disable Fast Startup (For UEFI such as after Windows 8)
turnoff-faststart-step1
Control Panel -> Power Option -> Choose what the power button do

turnoff-faststart-step2
Change setting that are currently unavailable

turnoff-faststart-step3
Un-check “Turn on fast startup (recommended)”, then, reboot the system


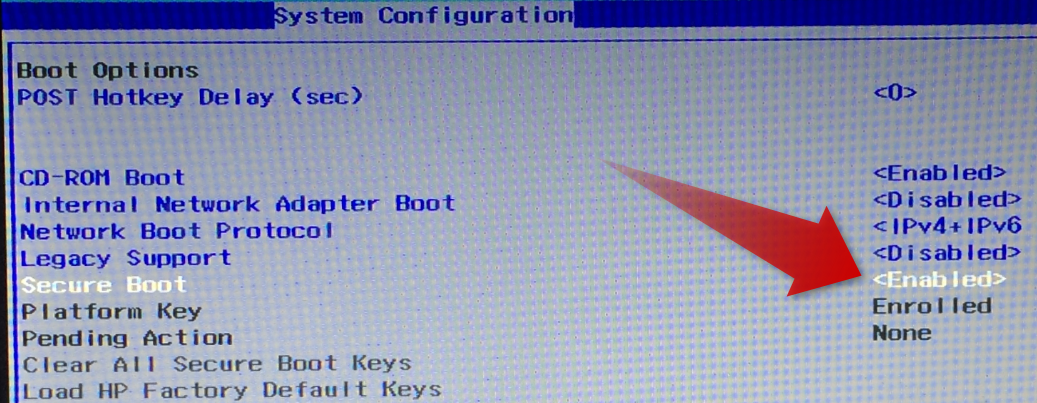
STEP3: Disable Secure Boot in UEFI (After Windows 8)
disabled-secureboot-img1
In boot option in BIOS, change “Enabled” to “Disabled”


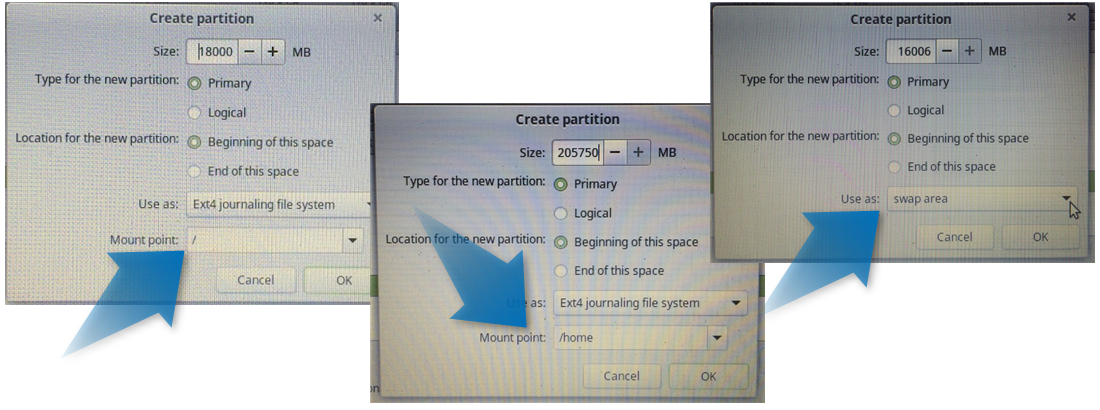
STEP4: Creating partitions manually
Basically, there are three partitions to be created: root, home, and swap
partition-image1
“/”:
Root is allocated depends in operating system. For Linux Mint, let’s say around 18GB

“/home”:
Home will be the rest of the space beside “root” and “swap”

“swap”:
Swap space is usually little more than the RAM, in my case 8GB of RAM doubled as 16GB
partitions

GIMP memo

header-gimp-icon
GIMP is free software for editing images, and I tried to add some function by downloading a file called “arrow.scm

sudo add-apt-repository ppa:otto-kesselgulasch/gimp
sudo apt-get update
sudo apt-get install gimp

Download and install as above.

nobu@HP15z:~/Downloads$ ls -l
total 283036
-rw-r----- 1 nobu nobu     11508 Jan  9 12:49 arrow.scm

And copy to under “scripts” folder for gimp directory:

$ sudo cp arrow.scm /usr/share/gimp/2.0/scripts

The file has been copied:

nobu@HP15z:/usr/share/gimp/2.0/scripts$ ls -l
...
-rw-r--r-- 1 root root  7713 Nov 22 13:13 alien-neon-logo.scm
-rw-r----- 1 root root 11508 Jan  9 13:06 arrow.scm
...
-rw-r--r-- 1 root root  4840 Nov 22 13:13 i26-gunya2.scm
drwxr-xr-x 2 root root  4096 Jan  9 09:44 images

Let it be readable by changing the permission:

0	---
1	--x
2	-w-
3	-wx
4	r--
5	r-x
6	rw-
7	rwx

chmod [option] [mode] [file or directory]

$ sudo chmod 644 arrow.scm
-rw-r--r-- 1 root root  7713 Nov 22 13:13 alien-neon-logo.scm
-rw-r--r-- 1 root root 11508 Jan  9 13:06 arrow.scm
-rw-r--r-- 1 root root  3559 Nov 22 13:13 basic1-logo.scm

Permission has been changed.
Note: By some reason, icon is still disabled

nobu@HP15z:~/Downloads$ sudo cp arrow.scm ~/.gimp-2.8/scripts/
nobu@HP15z:~/Downloads$ cd ~/.gimp-2.8/scripts/
nobu@HP15z:~/.gimp-2.8/scripts$ ls -ls
total 12
12 -rw-r----- 1 root root 11508 Jan  9 14:03 arrow.scm
nobu@HP15z:~/.gimp-2.8/scripts$ pwd
/home/nobu/.gimp-2.8/scripts
nobu@HP15z:~/.gimp-2.8/scripts$ sudo chmod 644 arrow.scm
nobu@HP15z:~/.gimp-2.8/scripts$ ls -ls
total 12
12 -rw-r--r-- 1 root root 11508 Jan  9 14:03 arrow.scm
nobu@HP15z:~/.gimp-2.8/scripts$

Changing the screen brightness for Ubuntu family

lubuntu-launch-header
Changing the screen brightness is the one of the first things you might want to work on. But unfortunately, there is no distinct method to do this after fresh installing because it depends on the system graphic driver.

In order to do this you will need to edit “rc.local” to set:

#1. Name of backlight
#2. Number indicates the brightness

echo #1 > /sys/class/backlight/#2/brightness

$sudo leafpad /etc/rc.local

For example, launch some text editor, add the line (at line 13), before “exit 0”:

#!/bin/sh -e
#
# rc.local
#
# This script is executed at the end of each multiuser runlevel.
# Make sure that the script will "exit 0" on success or any other
# value on error.
#
# In order to enable or disable this script just change the execution
# bits.
#
# By default this script does nothing.
echo 68 > /sys/class/backlight/intel_backlight/brightness
exit 0

To identify the name of a back light, it can be found under “/sys/class/backlight/”

$ ll /sys/class/backlight/

Example of output:

total 0
drwxr-xr-x  2 root root 0 Jan 18 16:48 ./
drwxr-xr-x 62 root root 0 Jan 18 16:48 ../
lrwxrwxrwx  1 root root 0 Jan 18 16:48 intel_backlight -> ../../devices/pci0000:00/0000:00:02.0/drm/card0/card0-eDP-1/intel_backlight/

In this case, the name of backlight is “intel_backlight”


To identify the number of brightness:
You need to identify the name of backlight, let’s say the name is “pizza”.
To find the current brightness: “cat /sys/class/backlight/pizza/brightness”
To find the maximum brightness: “cat /sys/class/backlight/pizza/max_brightness”

Example: the backlight name is “intel_backlight

$ cat /sys/class/backlight/intel_backlight/brightness
68
$ cat /sys/class/backlight/intel_backlight/max_brightness
255

In this examples, the current brightness is 68 and the maximum is 255.


Example to set the screen brightness as 68 as system start, the name of the backlight is “intel_backlight”

echo 68 > /sys/class/backlight/intel_backlight/brightness

Creating a brightness controller at desktop:

$sudo add-apt-repository ppa:indicator-brightness/ppa
$sudo apt-get update
$sudo apt-get install indicator-brightness

Restart the system, then you will see the controller.
brightness_controller1
Please do not set the brightness as 0, the entire screen will be black and there will be nothing you can do 🙂