Ubuntu X Window issue memo

ubuntu-header-img1
Working with Linux is sometime painful to encounter the issue like below. All of a sudden, you cannot login and got the error screen… If you cannot fix it, you need to re-install the system.
low-graphic-err-linux-msg1
I have encountered this problem with my Ubuntu 14.04 (without the disappointed face icons) and this is how I got over the problem.

Step 1: Press Ctrl + Alt + f1 key to get in command mode
Step 2: Re-install the graphic drivers
Step 3: Restart the system

I have tried some methods in Step 2 but following didn’t work for my laptop probably because of its Intel Graphic driver.

Drivers for Nvidia or AMD/ATI
Nvidia:

sudo apt-get install nvidia-current

AMD/ATI:

sudo apt-get install fglrx

This method finally worked, even though, login screen looking has little changed

Intel HD Graphics:

sudo apt-get install gdm

gmd-config-200x300
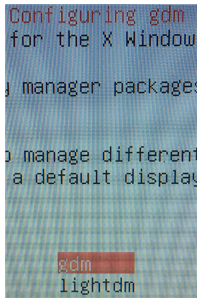
The solutions depends on the system, and this is for Intel HD Graphics.

During the install, you will be prompted to select Display Manager (DM). At this point, I choose “GDM” instead of lightDM (default for Ubuntu 14.04).

Ubuntu default login screen is lightDM, and GNOME is GDM. According to some resource, lightDM doesn’t work well in SSD. (Mine laptop is SSD). Therefore, GDM seems to be better for SSD.

sudo apt-get install numlockx
sudo leafpad /etc/lightdm/lightdm.conf

In my case, the error occur after installing numlockx to enable ten-key. The command above, and adding the following line at the end of “lightdm.conf”

greeter-setup-script=/usr/bin/numlockx on

The numlockx edit lightdm.conf that change the configuration for LightDM. This is probably why I got this error.. 🙁

Updated at 2016/01/19:
This error also occur my Lubuntu with the CPU, AMD Dual-Core E1-6015, and installing gdm also fixed the problem as Ubuntu run on Intel Core i7.

Linux Optimization Memo

linux-optimization-header1
Download following software

$ sudo apt-get install leafpad
$ sudo apt-get install gksu
$ sudo apt-get install Lxkeymap
$ sudo apt-get install inxi

GParted is helpful software especially using via installing devices (CD, DVD, USB memory):

$ sudo apt-get install gparted

Add getdeb repository:

wget -q -O - http://archive.getdeb.net/getdeb-archive.key | sudo apt-key add -
sudo sh -c 'echo "deb http://archive.getdeb.net/ubuntu wily-getdeb apps" >> /etc/apt/sources.list.d/getdeb.list'

Installing Wine 1.8:

sudo add-apt-repository ppa:ubuntu-wine/ppa
sudo apt-get update
sudo apt-get install wine1.8 winetricks
sudo dpkg --add-architecture i386
sudo add-apt-repository ppa:wine/wine-builds
sudo apt-get update
sudo apt-get install --install-recommends winehq-devel

Shutter is the capable screenshot software for Ubuntu

sudo add-apt-repository -y ppa:shutter/ppa
sudo apt-get update
sudo apt-get install shutter

Creating dual boot Windows 10 and Linux Mint

dualboot-heaer-img1
STEP1: Creating unmounted partition in HDD/SSD:
There is a famous tool for Linux such as GParted, or 3rd party software is also available


STEP2: Disable Fast Startup (For UEFI such as after Windows 8)
turnoff-faststart-step1
Control Panel -> Power Option -> Choose what the power button do

turnoff-faststart-step2
Change setting that are currently unavailable

turnoff-faststart-step3
Un-check “Turn on fast startup (recommended)”, then, reboot the system


STEP3: Disable Secure Boot in UEFI (After Windows 8)
disabled-secureboot-img1
In boot option in BIOS, change “Enabled” to “Disabled”


STEP4: Creating partitions manually
Basically, there are three partitions to be created: root, home, and swap
partition-image1
“/”:
Root is allocated depends in operating system. For Linux Mint, let’s say around 18GB

“/home”:
Home will be the rest of the space beside “root” and “swap”

“swap”:
Swap space is usually little more than the RAM, in my case 8GB of RAM doubled as 16GB
partitions

MySQL client for Lubuntu

header-linux-mysql-img1
MySQL Workbench is official and most widely known GUI client for MySQL. Here is how I installed.

$ sudo apt-get install mysql-workbench

Check the installation completed:

$ /usr/bin/mysql-workbench --help

To create launcher:

$ sudo leafpad .local/share/applications/mysql-workbench-bin.desktop

Add the following to .desktop file

[Desktop Entry]
Encoding=UTF-8
Version=1.0
Type=Application
Name=MySQL Workbench
Icon=mysql-workbench-bin
Exec=/usr/bin/mysql-workbench
StartupNotify=false
StartupWMClass=Mysql-workbench-bin
OnlyShowIn=Unity;
X-UnityGenerated=true

Launch MySQL workbench:
mysql-install-img1
1. Click plus sign right next to “My SQL Connection”
2. Enter “localhost” after Connection Name, hit “Test Connection” enter password


Adding a user:
Start the program and launch the terminal:

sudo /etc/init.d/mysql start
mysql -u root -p

Type following to define a user and its password:

GRANT ALL PRIVILEGES ON *.* TO (name)@localhost IDENTIFIED BY '(password)' WITH GRANT OPTION;
FLUSH PRIVILEGES;

Login as a new ID:

mysql -u (name) -p
Enter password: *****

2. Heidi SQL
I prefer Heidi SQL over SQL workbench because this is more user friendly. Since this has no Linux version, I have to use it over Wine.

MySQL installation on Lubuntu

header-linux-mysql-img1

sudo apt-get install yum

Install yum if needed, but my case, eventually I didn’t, but for future reference…

To start installing, run this command:

sudo apt-get install mysql-server

350x210-img
During the installation, the root password is being asked:

sudo netstat -tap | grep mysql

After the installation, type this to prevent autostart the server
Then, showing following output:
From the leftside:
———————————————————
[protocol][local address][outer address][status]

tcp        0      0 localhost:mysql         *:*                     LISTEN      3978/mysqld

To start terminal, type this, then enter password:

$ mysql -u root -p

Terminal started:

Welcome to the MySQL monitor.  Commands end with ; or \g.
Your MySQL connection id is 42
Server version: 5.5.46-0ubuntu0.14.04.2 (Ubuntu)

Copyright (c) 2000, 2015, Oracle and/or its affiliates. All rights reserved.

Oracle is a registered trademark of Oracle Corporation and/or its
affiliates. Other names may be trademarks of their respective
owners.

Type 'help;' or '\h' for help. Type '\c' to clear the current input statement.

mysql> 

Enter “status;”

mysql> status;
--------------
mysql  Ver 14.14 Distrib 5.5.46, for debian-linux-gnu (x86_64) using readline 6.3

Connection id:		42
Current database:	
Current user:		root@localhost
SSL:			Not in use
Current pager:		stdout
Using outfile:		''
Using delimiter:	;
Server version:		5.5.46-0ubuntu0.14.04.2 (Ubuntu)
Protocol version:	10
Connection:		Localhost via UNIX socket
Server characterset:	latin1
Db     characterset:	latin1
Client characterset:	utf8
Conn.  characterset:	utf8
UNIX socket:		/var/run/mysqld/mysqld.sock
Uptime:			30 min 19 sec

Threads: 1  Questions: 582  Slow queries: 0  Opens: 189  Flush tables: 1  Open tables: 41  Queries per second avg: 0.319
--------------

Changing to UTF-8:

sudo leafpad /etc/mysql/my.cnf

Add highlighted lines:

[mysqld]
#
# * Basic Settings
#
user		= mysql
pid-file	= /var/run/mysqld/mysqld.pid
socket		= /var/run/mysqld/mysqld.sock
port		= 3306
basedir		= /usr
datadir		= /var/lib/mysql
tmpdir		= /tmp
lc-messages-dir	= /usr/share/mysql
skip-external-locking
character-set-server=utf8
skip-character-set-client-handshake
default-storage-engine=INNODB

[mysqldump]
quick
quote-names
max_allowed_packet	= 16M
default-character-set=utf8

[mysql]
#no-auto-rehash	# faster start of mysql but no tab completition
default-character-set=utf8

Check the configuration has done correctly:
Restart and launch the terminal..

$ sudo /etc/init.d/mysql restart
...
$ mysql -u root -p

status;

mysql> status;
--------------
mysql  Ver 14.14 Distrib 5.5.46, for debian-linux-gnu (x86_64) using readline 6.3

Connection id:		72
Current database:	
Current user:		root@localhost
SSL:			Not in use
Current pager:		stdout
Using outfile:		''
Using delimiter:	;
Server version:		5.5.46-0ubuntu0.14.04.2 (Ubuntu)
Protocol version:	10
Connection:		Localhost via UNIX socket
Server characterset:	utf8
Db     characterset:	utf8
Client characterset:	utf8
Conn.  characterset:	utf8
UNIX socket:		/var/run/mysqld/mysqld.sock
Uptime:			48 sec

Threads: 1  Questions: 215  Slow queries: 0  Opens: 48  Flush tables: 1  Open tables: 41  Queries per second avg: 4.479
--------------

Config has changed it to UTF8 (highlighted lines)
Reference

GIMP memo

header-gimp-icon
GIMP is free software for editing images, and I tried to add some function by downloading a file called “arrow.scm

sudo add-apt-repository ppa:otto-kesselgulasch/gimp
sudo apt-get update
sudo apt-get install gimp

Download and install as above.

nobu@HP15z:~/Downloads$ ls -l
total 283036
-rw-r----- 1 nobu nobu     11508 Jan  9 12:49 arrow.scm

And copy to under “scripts” folder for gimp directory:

$ sudo cp arrow.scm /usr/share/gimp/2.0/scripts

The file has been copied:

nobu@HP15z:/usr/share/gimp/2.0/scripts$ ls -l
...
-rw-r--r-- 1 root root  7713 Nov 22 13:13 alien-neon-logo.scm
-rw-r----- 1 root root 11508 Jan  9 13:06 arrow.scm
...
-rw-r--r-- 1 root root  4840 Nov 22 13:13 i26-gunya2.scm
drwxr-xr-x 2 root root  4096 Jan  9 09:44 images

Let it be readable by changing the permission:

0	---
1	--x
2	-w-
3	-wx
4	r--
5	r-x
6	rw-
7	rwx

chmod [option] [mode] [file or directory]

$ sudo chmod 644 arrow.scm
-rw-r--r-- 1 root root  7713 Nov 22 13:13 alien-neon-logo.scm
-rw-r--r-- 1 root root 11508 Jan  9 13:06 arrow.scm
-rw-r--r-- 1 root root  3559 Nov 22 13:13 basic1-logo.scm

Permission has been changed.
Note: By some reason, icon is still disabled

nobu@HP15z:~/Downloads$ sudo cp arrow.scm ~/.gimp-2.8/scripts/
nobu@HP15z:~/Downloads$ cd ~/.gimp-2.8/scripts/
nobu@HP15z:~/.gimp-2.8/scripts$ ls -ls
total 12
12 -rw-r----- 1 root root 11508 Jan  9 14:03 arrow.scm
nobu@HP15z:~/.gimp-2.8/scripts$ pwd
/home/nobu/.gimp-2.8/scripts
nobu@HP15z:~/.gimp-2.8/scripts$ sudo chmod 644 arrow.scm
nobu@HP15z:~/.gimp-2.8/scripts$ ls -ls
total 12
12 -rw-r--r-- 1 root root 11508 Jan  9 14:03 arrow.scm
nobu@HP15z:~/.gimp-2.8/scripts$

Changing the screen brightness for Ubuntu family

lubuntu-launch-header
Changing the screen brightness is the one of the first things you might want to work on. But unfortunately, there is no distinct method to do this after fresh installing because it depends on the system graphic driver.

In order to do this you will need to edit “rc.local” to set:

#1. Name of backlight
#2. Number indicates the brightness

echo #1 > /sys/class/backlight/#2/brightness

$sudo leafpad /etc/rc.local

For example, launch some text editor, add the line (at line 13), before “exit 0”:

#!/bin/sh -e
#
# rc.local
#
# This script is executed at the end of each multiuser runlevel.
# Make sure that the script will "exit 0" on success or any other
# value on error.
#
# In order to enable or disable this script just change the execution
# bits.
#
# By default this script does nothing.
echo 68 > /sys/class/backlight/intel_backlight/brightness
exit 0

To identify the name of a back light, it can be found under “/sys/class/backlight/”

$ ll /sys/class/backlight/

Example of output:

total 0
drwxr-xr-x  2 root root 0 Jan 18 16:48 ./
drwxr-xr-x 62 root root 0 Jan 18 16:48 ../
lrwxrwxrwx  1 root root 0 Jan 18 16:48 intel_backlight -> ../../devices/pci0000:00/0000:00:02.0/drm/card0/card0-eDP-1/intel_backlight/

In this case, the name of backlight is “intel_backlight”


To identify the number of brightness:
You need to identify the name of backlight, let’s say the name is “pizza”.
To find the current brightness: “cat /sys/class/backlight/pizza/brightness”
To find the maximum brightness: “cat /sys/class/backlight/pizza/max_brightness”

Example: the backlight name is “intel_backlight

$ cat /sys/class/backlight/intel_backlight/brightness
68
$ cat /sys/class/backlight/intel_backlight/max_brightness
255

In this examples, the current brightness is 68 and the maximum is 255.


Example to set the screen brightness as 68 as system start, the name of the backlight is “intel_backlight”

echo 68 > /sys/class/backlight/intel_backlight/brightness

Creating a brightness controller at desktop:

$sudo add-apt-repository ppa:indicator-brightness/ppa
$sudo apt-get update
$sudo apt-get install indicator-brightness

Restart the system, then you will see the controller.
brightness_controller1
Please do not set the brightness as 0, the entire screen will be black and there will be nothing you can do 🙂

Setup Memo: Tomcat 7 on eclipse

tomcat-bk-header
Following commands get Tomcat

sudo apt-get update
sudo apt-get install tomcat7

While installing I was being asked

Creating config file /etc/logrotate.d/tomcat7 with new version
 * no JDK or JRE found - please set JAVA_HOME
invoke-rc.d: initscript tomcat7, action "start" failed.

I tried run this command to prepare JAVA_HOME, then I got this message:

$ vim ~/.bashrc

Now I need to install “vim” by following error message:
“The program ‘vim’ can be found in the following packages…”

sudo apt-get install vim

After installing vim, open the file, and go to the last line by press ‘G’ key, then press ‘i’ to be edit mode, and add following, then press ‘esc’ key to exit the edit mode, then save it and close it by type ‘:wq’

JAVA_HOME=$(readlink -f /usr/bin/javac | sed "s:/bin/javac::")
export JAVA_HOME
PATH=$PATH:$JAVA_HOME/bin
export PATH

Check the result:

$ echo $JAVA_HOME
/usr/lib/jvm/java-8-oracle
$ echo $PATH
/usr/local/sbin:/usr/local/bin:/usr/sbin:/usr/bin:/sbin:/bin:/usr/games:/usr/local/games:/usr/lib/jvm/java-8-oracle/bin
$ readlink -f /usr/bin/javac
/usr/lib/jvm/java-8-oracle/bin/javac

Run this command to edit tomcat config file

sudo nano /etc/default/tomcat7

OR for Lubuntu

sudo leafpad /etc/default/tomcat7

I replaced “JAVA_HOME” and “JAVA_OPTS”

JAVA_OPTS="-Djava.security.egd=file:/dev/./urandom -Djava.awt.headless=true -Xmx512m -XX:MaxPermSize=256m -XX:+UseConcMarkSweepGC"
JAVA_HOME=/usr/lib/jvm/java-8-oracle

Run tomcat:

sudo service tomcat7 restart

Then go this http://127.0.0.1:8080. It worked!
tomcat-worked

sudo apt-get install tomcat7-docs tomcat7-admin tomcat7-examples

Some additional installation.

Check the tomcat installed:

$ whereis tomcat7
tomcat7: /etc/tomcat7 /usr/share/tomcat7

Need to give permissions for Tomcat:

cd /usr/share/tomcat7
sudo ln -s /var/lib/tomcat7/conf conf
sudo ln -s /etc/tomcat7/policy.d/03catalina.policy conf/catalina.policy
sudo ln -s /var/log/tomcat7 log
sudo chmod -R 777 /usr/share/tomcat7/conf
sudo ln -s /var/lib/tomcat7/common common
sudo ln -s /var/lib/tomcat7/server server
sudo ln -s /var/lib/tomcat7/shared shared

Adding the Tomcat as eclipse server:
Window -> Pereferemces -> Server -> Runtime Environments -> Add
2016-01-08-214109_eclipse_tomcat
Enter the Tomcat installed directory and specify the JRE, then hit “Finish”
2016-01-08-214827_eclipse1
Tomcat had been added as a eclipse server.

To disable autostart for a service

sudo update-rc.d tomcat7 disable

To open config file:

nobu@HP15z:/etc/init.d$ sudo leafpad tomcat7

Selection_005
Tomcat can be started manually via eclipse server

How to setup eclipse in Linux

eclipse-header
My environment is Lubuntu 14.04

nobu@nobu-HP-Notebook:~$ java -version
java version "1.7.0_91"
OpenJDK Runtime Environment (IcedTea 2.6.3) (7u91-2.6.3-0ubuntu0.14.04.1)
OpenJDK 64-Bit Server VM (build 24.91-b01, mixed mode)
nobu@nobu-HP-Notebook:~$ readlink -f $(which java)
/usr/lib/jvm/java-7-openjdk-amd64/jre/bin/java
nobu@nobu-HP-Notebook:~$ 

After doing some reserch, OpenJDK is not as good as “regular” JDK for eclipse
So, I tried to download “regular” JDK 8

nobu@nobu-HP-Notebook:~$ sudo add-apt-repository ppa:webupd8team/java

After running this command, I realized that I should remove OpenJDK

nobu@nobu-HP-Notebook:~$ java -version
java version "1.7.0_91"
OpenJDK Runtime Environment (IcedTea 2.6.3) (7u91-2.6.3-0ubuntu0.14.04.1)
OpenJDK 64-Bit Server VM (build 24.91-b01, mixed mode)
nobu@nobu-HP-Notebook:~$ sudo update-alternatives --config java
There are 2 choices for the alternative java (providing /usr/bin/java).

  Selection    Path                                            Priority   Status
------------------------------------------------------------
* 0            /usr/lib/jvm/java-7-openjdk-amd64/jre/bin/java   1071      auto mode
  1            /usr/lib/jvm/java-7-openjdk-amd64/jre/bin/java   1071      manual mode
  2            /usr/lib/jvm/java-8-oracle/jre/bin/java          1         manual mode

Press enter to keep the current choice[*], or type selection number: 2   
update-alternatives: using /usr/lib/jvm/java-8-oracle/jre/bin/java to provide /usr/bin/java (java) in manual mode

Then I remove the OpenJDK as follow:

nobu@nobu-HP-Notebook:~$ sudo apt-get purge openjdk*

Now removed:

nobu@nobu-HP-Notebook:~$ sudo update-alternatives --config java
There is 1 choice for the alternative java (providing /usr/bin/java).

  Selection    Path                                     Priority   Status
------------------------------------------------------------
  0            /usr/lib/jvm/java-8-oracle/jre/bin/java   1         auto mode
* 1            /usr/lib/jvm/java-8-oracle/jre/bin/java   1         manual mode

And run following commands

sudo add-apt-repository ppa:webupd8team/java
sudo apt-get update
sudo apt-get install oracle-java8-installer
sudo apt-get install oracle-java8-set-default

Let’s see how it’s been installed

nobu@nobu-HP-Notebook:~$ readlink -f $(which java)
/usr/lib/jvm/java-8-oracle/jre/bin/java
nobu@nobu-HP-Notebook:~/Downloads$ java -version
java version "1.8.0_66"
Java(TM) SE Runtime Environment (build 1.8.0_66-b17)
Java HotSpot(TM) 64-Bit Server VM (build 25.66-b17, mixed mode)

Downloading eclipse:
Eclipse has been download under Home\Downlolads foloder, and extract .gz file

Run this commands to move eclipse folder under opt directory:

$ cd ~/Downloads

1. Move to the folder where eclipse has downloaded

$ sudo tar -zxvf eclipse-jee-mars-1-linux-gtk-x86_64.tar.gz -C /opt

2. extract and copy the eclipse under opt directory
Note: -zxvf is extracting command for “.gz” archive file

$ gksudo gedit /usr/share/applications/eclipse.desktop

3. After the eclipse has been created, open this file and paste the below info:
Note: “gedit” is not for Lubuntu since Ubuntu uses GNOME, but Lubuntu is LXDE.

$ sudo leafpad /usr/share/applications/eclipse.desktop

Therefore, needs to use leafpad instead of gedit.

[Desktop Entry]
Name=Eclipse 4
Type=Application
Exec=/opt/eclipse/eclipse
Terminal=false
Icon=/opt/eclipse/icon.xpm
Comment=Integrated Development Environment
NoDisplay=false
Categories=Development;IDE;
Name[en]=Eclipse

eclipse-workbench-launch
The eclipse launch with default work space