In Spring MVC Web apps, there might be multiple combination between Controller, JSP(View), and Object class(Model). In other words, almost any combination is possible.
It is a lot more flexible compared to Struts which tied one Action class (controller class) tied with Form class (object model class).
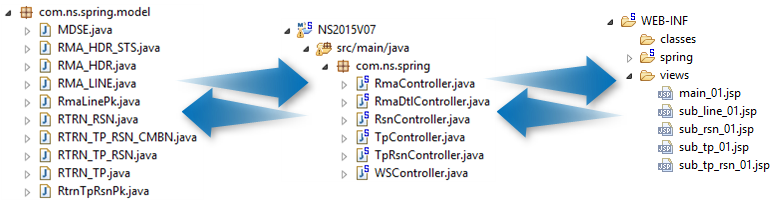
There are number of Controller, Model classes, and views (JSP) in one Web App, and this examples shows the screen transition involved between two controllers and views (JSP).

Summarized as four steps:
- First Controller calls the first JSP.
- First JSP calls the second Controller.
- Second Controller calls the second JSP.
- Second JSP is initialized.
Step 1 to 2. The first Controller (RmaController.java) calls main_01.jsp.
Step 2 to 3. The main_01.jsp calls second controller RmaDtlController.java.
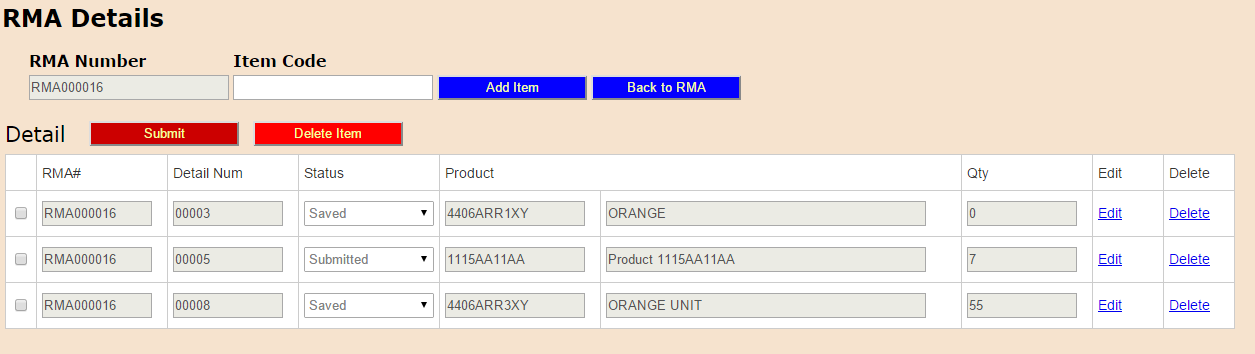
Step 4. The second JSP (sub_line_01.jsp) is initialized.
Again (1 to 2), the first controller (RmaController.java) is invoked by a link, and calls second controller (RmaDtlController.java).


Let’s look at step (2 to 3):
The main_01.jsp calls second controller RmaDtlController.java once the link is clicked (line 16).
<c:forEach items="${HDR_LIST}" var="rmaObj" varStatus="loop">
	<tr height="15">
		<td><form:radiobutton path="radioBtn" class='close clickIdx' data-id='${rmaObj.id}' /></td>
		<td><form:checkbox path="selectedCheckBox" value="${rmaObj.rmaNum}"/></td>
		<td id="id${loop.index}">${rmaObj.id}</td>
		<td id="idRmaNum${loop.index}">${rmaObj.rmaNum}</td>
		<td id="idStsCd${loop.index}">${rmaObj.rmaHdrStsCd}</td>
		<td id="idStsNm${loop.index}">${rmaObj.rmaHdrStsNm}</td>
		<td id="idTpCd${loop.index}">${rmaObj.rtrnTpCd}</td>
		<td id="idTpNm${loop.index}">${rmaObj.rtrnTpNm}</td>
		<td id="idRsnCd${loop.index}">${rmaObj.rtrnRsnCd}</td>
		<td id="idRsnNm${loop.index}">${rmaObj.rtrnRsnNm}</td>
		<td id="idCustCd${loop.index}">${rmaObj.sellToCustCd}</td>
		<td><a href="<c:url value='/edit/${rmaObj.id}' />" >Edit</a></td>
		<td><a href="<c:url value='/remove/${rmaObj.id}' />" >Delete</a></td>
		<td><a href="<c:url value='/cUrlValSubLine01Jsp/${rmaObj.rmaNum}' />" >Detail</a></td>
	</tr>
</c:forEach>

In the line 16:
2.1. Link clicked contains an ID (RMA000016)
2.2. “cUrlValSubLine01Jsp” specified in second JSP (sub_line_01.jsp) and it will be called
![]()
2.3. The URL for second JSP: http://localhost:8080/NS2015V07/cUrlValSubLine01Jsp/RMA000016
Step 3: Second Controller calls the second JSP.
@RequestMapping("/cUrlValSubLine01Jsp/{rmaNum}")
public ModelAndView goToSubLine01Jsp(@PathVariable("rmaNum") String rmaNum,	Model model, HttpServletRequest req) {
	List<RmaLineModel> rmaLineModelList = RmaDtlBL.getRmaLineListWithCdTblNm(rmaNum, null);
	return getMVSubLine01(rmaNum, rmaLineModelList, req);
}
3.1. Returns ModelAndView object
private ModelAndView getMVSubLine01(String rmaNum, List<RmaLineModel> rmaLinsList, HttpServletRequest req) {

	RmaLineListModel newModel = new RmaLineListModel(rmaNum, rmaLinsList);

	ModelAndView modelAndView = new ModelAndView(VIEW.SUB_LINE_01.getVal());
	modelAndView.addObject(CONST.FORM_KEY.getVal(), newModel);
	// For item detail list
	modelAndView.addObject(CONST.LINE_LIST_MODEL.getVal(), newModel);
	// Setup Status drop down line the item list
	modelAndView.addObject(CONST.HDR_STS_LIST.getVal(), getList(CONST.HDR_STS_LIST.getVal()));
	// Item list for AJAX Auto complete
	req.getSession().setAttribute(CONST.MDSE_LIST.getVal(), getList(CONST.MDSE_LIST.getVal()));
	return modelAndView;
}
In the line 5:
3.2. Get the view name (“sub_line_01”) as constant (below) and set it to the object
enum VIEW {

	MAIN_01("main_01"),
	SUB_LINE_01("sub_line_01"),
	SUB_TP_01("sub_tp_01"),
	SUB_RSN_01("sub_rsn_01"),
	SUB_TP_RSN_01("sub_tp_rsn_01"),
	REDIRECT_HOME("redirect:/ns-home")
	;

	private String code;

	VIEW(String code) {
		this.code = code;
	}

	public String getVal() {
		return code;
	}
}
Step 4: Second JSP is initialized.