Auto Complete

autocomplete3
In Biz web apps, an end user often need to enter some code that he/she cannot memorize. For for example, a product code. And auto complete is very helpful and it is a commonly used in Ajax.

Summarized as two steps

  1. Javascript function is being called every time a key stroked on keyboard
  2. Ajax calls a controller class and the controller class returns a suggested list

2015-05-29_07h14_55


1. Javascript function is being called every time a key stroked on keyboard

<form:input path="mdseCd" id="idItemCd" style="height:25px; width:200px" />

Step 1.1. Javascript (Ajax) will be called as user types a key

$('#idItemCd').autocomplete({
   serviceUrl: '${pageContext.request.contextPath}/autoCompleteList',
   paramName: "inputVal",
   delimiter: ",",
   transformResult: function(response) {
       return {
           suggestions: $.map($.parseJSON(response), function(item) {
               return {
                   value: item.mdseCd,
                   data: item.id
               };
           })
       };
   }
});

Step 1.2. This Ajax send a request to the controller method:


2. Ajax calls a controller class and the controller class returns a suggested list

@RequestMapping(value = "/autoCompleteList", method = RequestMethod.GET)
public @ResponseBody List<MdseModel> getTags(@RequestParam(value = "inputVal") String inputVal, HttpServletRequest req) {
	List<MdseModel> entireSessionList = (List<MdseModel>)req.getSession().getAttribute(CONST.MDSE_LIST.getVal());
	List<MdseModel> resultList = new ArrayList<MdseModel>();
	if (!CommonBL.isEmpty(entireSessionList)) {
		for (MdseModel obj : entireSessionList) {
			// Fuzzy search
			if (obj.getMdseCd().contains(inputVal)) {
				resultList.add(obj);
			}
		}
	}
	return resultList;
}

Step 2.1. At line 3, getting a entireSessionList contains an entire list that has been created as the screen is initialized.
2015-05-30_08h10_19
Step 2.2. At line 8 to 10, the method creating a list that starts from “5508
Step 2.3. At line 13, the method returns the list as JSON object.

HTML Table Creation

hdr-ajax-tempate3
More biz web apps are using Javascript because of its capability; Handling an event.
In this example, the HTML tables are constructed on changing event of select box.

Summary

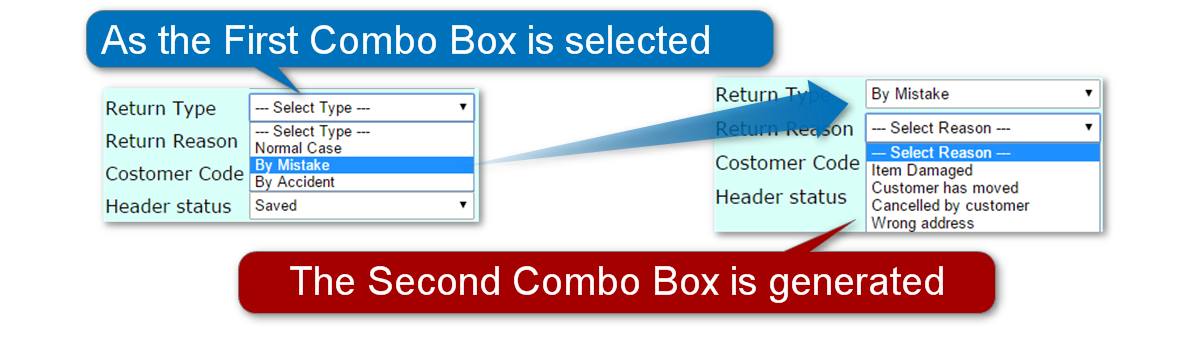
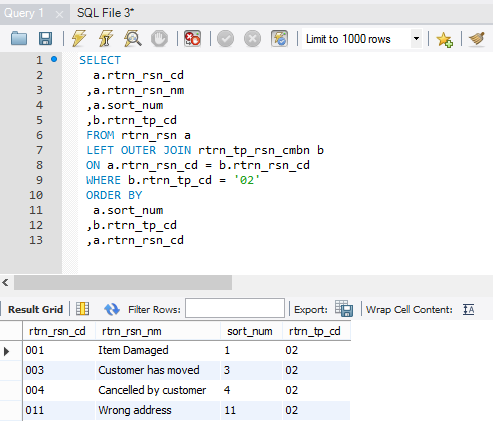
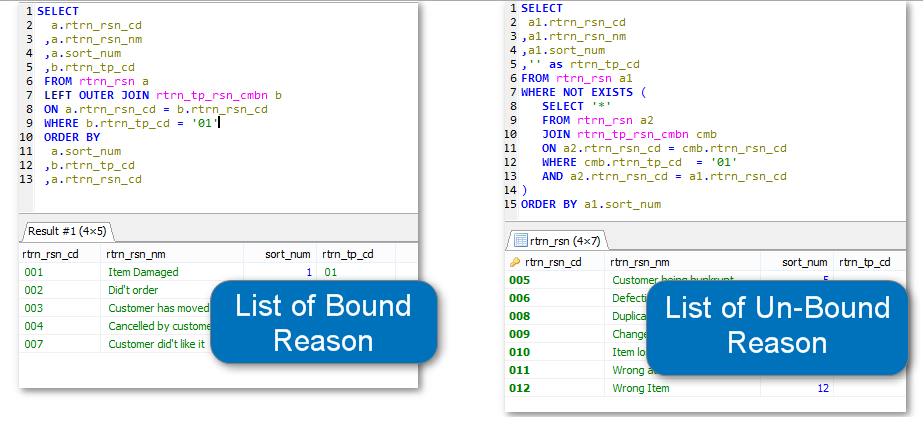
  • The table on left side constructed by a result of SQL (as select box value has been changed)
  • The table on right side constructed by a result of different SQL (at the same time of when the one in the left constructed)

dinamic-table-creation-result2
compare-two-tables1

Summarized as Four steps

  1. Select box has changed and the Javascript (Ajax) send request to the Controller
  2. The Controller method create a object for two tables (LEFT and RIGHT) and send back response
  3. Javascript (Ajax) receives a response and construct two set of HTML
  4. Two HTML tables (LEFT and RIGHT) are created by jQuery

1. Select box has changed and the Javascript (Ajax) send request to the Controller

<form:select path="rtrnTpCd" id="tpCd" onchange="onChangeTp();" style="height:25px; width:200px">
   <form:option value="" label="--- Select Type ---"/>
   <c:forEach items="${TP_LIST}" var="name">
      <c:choose>
         <c:when test="${name.getRtrnTpCd()== TP_SELECTED}">
            <form:option value="${name.getRtrnTpCd()}" selected="true">${name.getRtrnTpNm()}</form:option>
         </c:when>
         <c:otherwise>
            <form:option value="${name.getRtrnTpCd()}">${name.getRtrnTpNm()}</form:option>
         </c:otherwise>
      </c:choose>
   </c:forEach>
</form:select>

Step 1.1. At line 1, when select box is selected, it’s calling Javascript function “onChangeTp()“.

function onChangeTp() {
   var selectedTpCd = $('#tpCd').val();
   $.ajax({
      type : "Get", 
      url : "onChangeTpCdTpRsn01",
      data : "tpCd=" + selectedTpCd,
      success : function(response) {
         // Remove the row excluding the first row
         $("#idTableRsnBound").find("tr:gt(0)").remove();
         $("#idTableRsnUnBound").find("tr:gt(0)").remove();
         var trHtmlBound = '';
         var trHtmlUnBound = '';
         $.each(response, function(k, v) {
            var thisTpCd = v.rtrnTpCd;
            if(thisTpCd == selectedTpCd) {
               trHtmlBound = getRsnLines(trHtmlBound, k, v);
            } else {
               trHtmlUnBound = getRsnLines(trHtmlUnBound, k, v);
            }
         });
         $('#idTableRsnBound').append(trHtmlBound);
         $('#idTableRsnUnBound').append(trHtmlUnBound);
      },
      error : function(e) {
         alert('Error onChangeTp: ' + e);
      }
   });
}

Step 1.2. At line 5, the Ajax request for the controller “onChangeTpCdTpRsn01“.


2. The Controller method create a object for two tables (LEFT and RIGHT) and send back response

@RequestMapping(value = "/onChangeTpCdTpRsn01")
public @ResponseBody List<RtrnRsnModel> refreshTypeComb(@RequestParam(value = "tpCd") String rtrnTpCd, Model model, HttpServletRequest req) {

	model.addAttribute(CONST.FORM_KEY.getVal(), new RtrnTpModel());
	model.addAttribute("rtrnTpCd", rtrnTpCd);
	model.addAttribute(CONST.TP_SELECTED.getVal(), rtrnTpCd);
	req.getSession().setAttribute(CONST.TP_SELECTED.getVal(), rtrnTpCd);
	initBoundUnboundRsnList(rtrnTpCd, req);

	List<RtrnRsnModel> rsnBoundList = (List<RtrnRsnModel>)req.getSession().getAttribute(CONST.RSN_LIST_BOUND.getVal());
	List<RtrnRsnModel> rsnUnBoundList = (List<RtrnRsnModel>)req.getSession().getAttribute(CONST.RSN_LIST_UNBOUND.getVal());
	List<RtrnRsnModel> rsnList = new ArrayList<RtrnRsnModel>();
	TpRsnBL.setNewRsnList(rsnList, rsnBoundList);
	TpRsnBL.setNewRsnList(rsnList, rsnUnBoundList);
	return rsnList;
}

Step 2.1. At line 10, set the SQL result for the LEFT SIDE table.
Step 2.2. At line 11, set the SQL result for the RIGHT SIDE table.
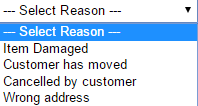
[
	Reason Code:001, Name:Item Damaged, Type:01,
	Reason Code:002, Name:Did not order, Type:01,
	Reason Code:003, Name:Customer has moved, Type:01,
	Reason Code:004, Name:Cancelled by customer, Type:01,
	Reason Code:007, Name:Customer did not like it, Type:01,
	Reason Code:005, Name:Customer being bunkrupt, Type:,
	Reason Code:006, Name:Defective Item, Type:,
	Reason Code:008, Name:Duplicated order, Type:,
	Reason Code:009, Name:Change his/her mind, Type:,
	Reason Code:010, Name:Item lost, Type:,
	Reason Code:011, Name:Wrong address, Type:,
	Reason Code:012, Name:Wrong Item, Type:
]

Step 2.3. At line 15, return as one object (ABOVE) combined LEFT and RIGHT tables.

NOTE: Line 2 to 6 ends with “Type:01” will be the LEFT table


3. Javascript (Ajax) receives a response and construct two tables

function onChangeTp() {
   var selectedTpCd = $('#tpCd').val();
   $.ajax({
      type : "Get", 
      url : "onChangeTpCdTpRsn01",
      data : "tpCd=" + selectedTpCd,
      success : function(response) {
         // Remove the row excluding the first row
         $("#idTableRsnBound").find("tr:gt(0)").remove();
         $("#idTableRsnUnBound").find("tr:gt(0)").remove();
         var trHtmlBound = '';
         var trHtmlUnBound = '';
         $.each(response, function(k, v) {
            var thisTpCd = v.rtrnTpCd;
            if(thisTpCd == selectedTpCd) {
               trHtmlBound = getRsnLines(trHtmlBound, k, v);
            } else {
               trHtmlUnBound = getRsnLines(trHtmlUnBound, k, v);
            }
         });
         $('#idTableRsnBound').append(trHtmlBound);
         $('#idTableRsnUnBound').append(trHtmlUnBound);
      },
      error : function(e) {
         alert('Error onChangeTp: ' + e);
      }
   });
}

Step 3.1. At line 7, get the response from the controller (one list as JSON object)
Step 3.2. At line 9 and 10, clear the LEFT and RIGHT to be re-constructed

function getRsnLines(trHtml, idx, dataObj) {
   //Get each key and value from the list
   var code = dataObj.rtrnRsnCd;
   var val = dataObj.rtrnRsnNm;
   trHtml +=
	      '<tr>'
	      + '<td>'
	      +   '<input id="selectedCheckBox'+idx+'" name="selectedCheckBox" type="checkbox" value="'+code+'"/>'
	      + '</td>'
	      + '<td>'+code+'</td>'
	      + '<td>'+val+'</td>'
	      +'</tr>';
   return trHtml;
}

Step 3.3. At line 15 to 19, create two HTML tables (LEFT and RIGHT) by function “getRsnLines” (above).


4. Two HTML tables (LEFT and RIGHT) are created by jQuery

function onChangeTp() {
   var selectedTpCd = $('#tpCd').val();
   $.ajax({
      type : "Get", 
      url : "onChangeTpCdTpRsn01",
      data : "tpCd=" + selectedTpCd,
      success : function(response) {
         // Remove the row excluding the first row
         $("#idTableRsnBound").find("tr:gt(0)").remove();
         $("#idTableRsnUnBound").find("tr:gt(0)").remove();
         var trHtmlBound = '';
         var trHtmlUnBound = '';
         $.each(response, function(k, v) {
            var thisTpCd = v.rtrnTpCd;
            if(thisTpCd == selectedTpCd) {
               trHtmlBound = getRsnLines(trHtmlBound, k, v);
            } else {
               trHtmlUnBound = getRsnLines(trHtmlUnBound, k, v);
            }
         });
         $('#idTableRsnBound').append(trHtmlBound);
         $('#idTableRsnUnBound').append(trHtmlUnBound);
      },
      error : function(e) {
         alert('Error onChangeTp: ' + e);
      }
   });
}

At line 21 and 22, two set of HTML will be set to the ID specified:

<div class="id_Bound">
<table id="idTableRsnBound" class="tg" border="1">
	<tr>
		<th width="20"></th>
		<th width="80">Reason Code</th>
		<th width="120">Reason Name</th>
	</tr>							
	<c:forEach items="${RSN_LIST_BOUND}" var="rsnVal" varStatus="loop">
		<tr>
			<td><form:checkbox path="selectedCheckBox" value="${rsnVal.rtrnRsnCd}"/></td>
			<td>${rsnVal.rtrnRsnCd}</td>
			<td>${rsnVal.rtrnRsnNm}</td>
		</tr>
	</c:forEach>
</table>
</div>

Step 4.1. At line 21, create (set HTML) to the table on the LEFT (#idTableRsnBound)

<div class="id_UnBound">
<table id="idTableRsnUnBound" class="tg" border="1">
	<tr>
		<th width="20"></th>
		<th width="80">Reason Code</th>
		<th width="120">Reason Name</th>
	</tr>
	<c:forEach items="${RSN_LIST_UNBOUND}" var="rsnVal" varStatus="loop">
		<tr>
			<td><form:checkbox path="selectedCheckBox" value="${rsnVal.rtrnRsnCd}"/></td>
			<td>${rsnVal.rtrnRsnCd}</td>
			<td>${rsnVal.rtrnRsnNm}</td>
		</tr>
	</c:forEach>
</table>
</div>

Step 4.2. At line 22, create (set HTML) to the table on the RIGHT (#idTableRsnUnBound)

Updating an MVC Partial View

hdr-ajax-partial-update-img1
Unlike submitting a ENTIRE FORM, Ajax web apps is commonly used to update ONLY A PART OF HTML. This section is continued from the previous section.
partial-mvc-update
This example only update one of multiple rows in a HTML:

radio-button-selected-and-copied-img1
(Above image) Copied fields (on the right side) will be registered in Data base and the row in a screen. (Below image)
updated-row1

Summarized as five steps:

  1. Take the form values from the form and call the Javascript (with Ajax) function
  2. Send request to the Controller with the object
  3. The controller receives the request and register the database
  4. The controller response the Ajax with the object
  5. J-Query function update the HTML as response object

2015-05-25_21h12_31
By Pressing this button:

<input type="button" id="idSubmitHdr" value="Update RMA" style="height:25px; width:150px; color: #F6FDA4; background-color: #0400FF; font-face: 'Comic Sans MS';"/>
$(function() {
   $('#idSubmitHdr').on('click',function() {

      var idId = $("#idId").val();
      var idRmaNum = $("#idRmaNum").val();
      var id_tpCd = $("div.id_tpCd select").val();
      var id_RsnCd = $("div.id_RsnCd select").val();
      var idSellTo = $("#idSellTo").val();
      var id_HdrSts = $("div.id_HdrSts select").val();

      var rmaHdrModel = {
         "id" : idId,
         "rmaNum" : idRmaNum,
         "rtrnTpCd" : id_tpCd,
         "rtrnRsnCd" : id_RsnCd,
         "sellToCustCd" : idSellTo,
         "rmaHdrStsCd" :id_HdrSts
      }
      $.ajax({
         type : 'POST', 
         url : 'submitHdrByJsonMain01',
         contentType : 'application/json; charset=utf-8',
         dataType : 'json',
         data: JSON.stringify(rmaHdrModel),
         success : function(data) {
            modifyRowData(data);
         },
         error : function(e) {
            alert("error:" +response+ ":" +e);
         }
      });
   });
});

Step 1. The above Javascript function takes six values from the form, and created as one object (Line 2 and 12 to 17).
Step 2. Send request to the Controller with the object
NOTE: use “JSON.stringify” function (line 24)

@RequestMapping(value = "/submitHdrByJsonMain01", method = RequestMethod.POST)
public @ResponseBody RmaHdrModel submitHdrByJson(@RequestBody RmaHdrModel rma, HttpServletRequest req) {		
	RMA_HDR obj = RmaBL.saveHdr(rma, req);
	return RmaBL.getRmaHdrModel(obj.getRmaNum());
}

Step 3 and 4. The controller receives the request and register the data base and returns a JSON object to Javascript.

function modifyRowData(newData) {
   var id = newData.id;
   var rmaNum = newData.rmaNum;
   var stsCd = newData.rmaHdrStsCd;
   var stsNm = newData.rmaHdrStsNm;
   var tpCd = newData.rtrnTpCd;
   var tpNm = newData.rtrnTpNm;
   var rsnCd = newData.rtrnRsnCd;
   var rsnNm = newData.rtrnRsnNm;
   var custCd = newData.sellToCustCd;

   $('#IdHdrDtl tr').each(function() { 
      var currRmaNum = $(this).find('td').eq(3).text(); // rmaNum
      var currStsCd = $(this).find('td').eq(4).text(); // StsCd
      var currStsNm = $(this).find('td').eq(5).text();
      var currTpCd = $(this).find('td').eq(6).text(); // TpCd
      var currTpNm = $(this).find('td').eq(7).text();
      var currRsnCd = $(this).find('td').eq(8).text(); // RsnCd
      var currRsnNm = $(this).find('td').eq(9).text();
      var currCustCd = $(this).find('td').eq(10).text(); // CustCd

      var idRmaNum = $(this).find('td').eq(3).attr('id');
      var idStsCd = $(this).find('td').eq(4).attr('id');
      var idStsNm = $(this).find('td').eq(5).attr('id');
      var idTpCd = $(this).find('td').eq(6).attr('id');
      var idTpNm = $(this).find('td').eq(7).attr('id');
      var idRsnCd = $(this).find('td').eq(8).attr('id');
      var idRsnNm = $(this).find('td').eq(9).attr('id');
      var idCustCd = $(this).find('td').eq(10).attr('id');

      if(rmaNum == currRmaNum) {
         $("#"+ idStsCd).html(stsCd);
         $("#"+ idStsNm).html(stsNm);
         $("#"+ idTpCd).html(tpCd);
         $("#"+ idTpNm).html(tpNm);
         $("#"+ idRsnCd).html(rsnCd);
         $("#"+ idRsnNm).html(rsnNm);
         $("#"+ idCustCd).html(custCd);
         return false;
      }
   });
}

Step 5. Another Javascript function “modifyRowData” (Above) called and J-Query function update a part of HTML (specified row in this example).

Radio Button Events

radio-button-evegnt1
In business application, it is often common to have Radio Button in a collection.
And the Radio Button has an event handling:
radio-button-selected-and-copied-img1
Summarized as two steps:

  1. The radio button is selected at the specified row, and calls Ajax function, and function calls Controller
  2. The Controller returns the JSON object from Data base, and update the fields by jQuery

1. The radio button is selected at the specified row, and calls Ajax function, and function
selected-radio-button-img3
Step 1.1. At the line 3 of main_01.jsp, “${rmaObj.id}” contains the primary key of RMA_HDR.

<c:forEach items="${HDR_LIST}" var="rmaObj" varStatus="loop">
	<tr height="15">
		<td><form:radiobutton path="radioBtn" class='close clickIdx' data-id='${rmaObj.id}' /></td>
		<td><form:checkbox path="selectedCheckBox" value="${rmaObj.rmaNum}"/></td>
		<td id="id${loop.index}">${rmaObj.id}</td>
		<td id="idRmaNum${loop.index}">${rmaObj.rmaNum}</td>
		<td id="idStsCd${loop.index}">${rmaObj.rmaHdrStsCd}</td>
		<td id="idStsNm${loop.index}">${rmaObj.rmaHdrStsNm}</td>
		<td id="idTpCd${loop.index}">${rmaObj.rtrnTpCd}</td>
		<td id="idTpNm${loop.index}">${rmaObj.rtrnTpNm}</td>
		<td id="idRsnCd${loop.index}">${rmaObj.rtrnRsnCd}</td>				
		<td id="idRsnNm${loop.index}">${rmaObj.rtrnRsnNm}</td>
		<td id="idCustCd${loop.index}">${rmaObj.sellToCustCd}</td>
		<td><a href="<c:url value='/edit/${rmaObj.id}' />" >Edit</a></td>
		<td><a href="<c:url value='/remove/${rmaObj.id}' />" >Delete</a></td>
		<td><a href="<c:url value='/cUrlValSubLine01Jsp/${rmaObj.rmaNum}' />" >Detail</a></td>
	</tr>
</c:forEach>

Step 1.2. Send request by Ajax:

  • close clickIdx” calls the Javascript function (line 2)
  • Set the passing value “number” (line 4) and set request parameter as “idx” (line 9)
  • Set the request” onCheckRadioRmaMain01” (line 7)
$(function() {
   $(document).on('click', '.clickIdx', function() {
      var $this = $(this);
      var number = $this.data('id');
      $.ajax({
         type : 'POST', 
         url : 'onCheckRadioRmaMain01',
         dataType : 'json',
         data : "idx=" + number,
         success : function(data) {
            var id = data.id;
            var rmaNum = data.rmaNum;
            var rtrnTpCd = data.rtrnTpCd;
            var rtrnRsnCd = data.rtrnRsnCd;
            var sellToCustCd = data.sellToCustCd;
            var rmaHdrStsCd = data.rmaHdrStsCd;
            $("#idId").val(id);
            $("#idRmaNum").val(rmaNum);
            $("div.id_tpCd select").val(rtrnTpCd);
            $("div.id_RsnCd select").val(rtrnRsnCd);
            $("#idSellTo").val(sellToCustCd);
            $("div.id_HdrSts select").val(rmaHdrStsCd);
         },
         error : function(e) {
            alert("error:" +response+ ":" +e);
         }
      });
   });
});

2. The Controller returns the JSON object from Data base, and update the fields by jQuery
radio-button-call-controller-param-img1
Step 2.1. Controller method receives the request with parameter value “idx” which is the primary key to get the data from Database
Step 2.2. Return the result from the Database as JSON

@RequestMapping(value = "/onCheckRadioRmaMain01")
public @ResponseBody RmaHdrModel onCheckRadioRma(@RequestParam(value = "idx") int idx, Model model, HttpServletRequest req) {
	RmaHdrModel rmaHdrModel = new RmaHdrModel(this.hdrSvc.findById(idx));
	model.addAttribute(CONST.FORM_KEY.getVal(), rmaHdrModel);
	return rmaHdrModel;
}

Step 2.3. The response (JSON) has been set by jQuery “.val” specified by the field’s ID

$(function() {
   $(document).on('click', '.clickIdx', function() {
      var $this = $(this);
      var number = $this.data('id');
      $.ajax({
         type : 'POST', 
         url : 'onCheckRadioRmaMain01',
         dataType : 'json',
         data : "idx=" + number,
         success : function(data) {
            var id = data.id;
            var rmaNum = data.rmaNum;
            var rtrnTpCd = data.rtrnTpCd;
            var rtrnRsnCd = data.rtrnRsnCd;
            var sellToCustCd = data.sellToCustCd;
            var rmaHdrStsCd = data.rmaHdrStsCd;
            $("#idId").val(id);
            $("#idRmaNum").val(rmaNum);
            $("div.id_tpCd select").val(rtrnTpCd);
            $("div.id_RsnCd select").val(rtrnRsnCd);
            $("#idSellTo").val(sellToCustCd);
            $("div.id_HdrSts select").val(rmaHdrStsCd);
         },
         error : function(e) {
            alert("error:" +response+ ":" +e);
         }
      });
   });
});

Step 2.4. To the below: text, select box, …. etc

   <tr height="27">
      <td><form:label path="id"><spring:message text="ID"/></form:label></td>
      <td colspan="3">
         <form:input path="id" id="idId" readonly="true" size="8"  disabled="true" style="height:25px; width:200px"/>
         <form:hidden path="id" id="idId" />
      </td> 
   </tr>
   <tr height="27">
      <td><form:label path="rmaNum"><spring:message text="RMA number"/></form:label></td>
      <td colspan="3">
         <form:input path="rmaNum" id="idRmaNum" readonly="true" disabled="true" style="height:25px; width:200px"/>
         <form:hidden path="rmaNum" id="idRmaNum" />
      </td>
   </tr>
   <tr height="27">
      <td><form:label path="rtrnTpCd"><spring:message text="Return Type"/></form:label></td>
      <td>
         <!--<form:select path="rtrnTpCd" items="${TP_LIST}" itemLabel="rtrnTpNm" itemValue="rtrnTpCd" delimiter=" " style="height:20px; width:200px"/>-->
         <div class="id_tpCd">
            <form:select path="rtrnTpCd" id="idSelectTpCd" onchange="onChangeTp();" style="height:25px; width:200px">
               <form:option value="" label="--- Select Type ---"/>
               <form:options items="${TP_LIST}" itemValue="rtrnTpCd" itemLabel="rtrnTpNm"/>
            </form:select>
         </div>
      </td>
      <td><input type="submit" value="Edit Type" name="goToTp" style="height:20px; width:100px"/></td>
      <td><input type="submit" value="Combination" name="goToTpRsn" style="height:22px; width:100px; color: #F6FDA4; background-color: #01690D;"/></td>
   </tr>
   <tr height="27">
      <td><form:label path="rtrnRsnCd"><spring:message text="Return Reason"/></form:label></td>
      <td>
         <!--<form:select path="rtrnRsnCd" items="${RSN_LIST}" itemLabel="rtrnRsnNm" itemValue="rtrnRsnCd" delimiter=" " style="height:20px; width:200px"/>-->
         <div class="id_RsnCd">
         <form:select path="rtrnRsnCd" id="idSelectRsnCd" style="height:25px; width:200px">
            <form:option value="" label="--- Select Reason ---"/>
            <form:options items="${RSN_LIST}" itemValue="rtrnRsnCd" itemLabel="rtrnRsnNm"/>
         </form:select>
         </div>
      </td>
         <td colspan="2">
         <input type="submit" value="Edit Reason" name="goToRsn" style="height:20px; width:100px"/>
      </td>
   </tr>
   <tr height="27">
      <td><form:label path="sellToCustCd"><spring:message text="Costomer Code"/></form:label></td>
      <td colspan="3">
         <form:input path="sellToCustCd" id="idSellTo" style="height:25px; width:200px"/>
      </td>
   </tr>
   <tr height="27">
      <td><form:label path="rmaHdrStsCd"><spring:message text="Header status"/></form:label></td>
      <td colspan="3">
         <div class="id_HdrSts">
            <form:select path="rmaHdrStsCd" items="${HDR_STS_LIST}" id="idSelectStsCd" itemLabel="rmaHdrStsNm" itemValue="rmaHdrStsCd" delimiter=" " style="height:25px; width:200px"/>
         </div>
      </td>
   </tr>

To be continued

Dynamically Creating a Select Box

dropdown-event1
This section is continued from previous section. Select box will be generated as being triggered.
dynamic-combo1

Summarized as three steps:

  1. Javascript function takes two parameters (list of JSON object and ID for select box)
  2. The function clear the select box to be re-constructed
  3. HTML Option tag is created one by one (key and value)

1. Javascript function takes two parameters (list of JSON object and ID for select box)

   $.ajax({
      type : "Get", 
      url : "onChangeTpCdRsnMain01",
      dataType: 'json',
      data : "tpCd=" + tpCd,
      success : function(data) {
         refreshCombo(data, "idSelectRsnCd");
      },
      error : function(e) {
         alert("error:" +response+ ":" +e);
      }
   });

Step 1.1. At line 7, the function call with parameters:

  1. A list of JSON object
  2. [
       Reason Code:001, Name:Item Damaged, Type:02, 
       Reason Code:003, Name:Customer has moved, Type:02, 
       Reason Code:004, Name:Cancelled by customer, Type:02, 
       Reason Code:011, Name:Wrong address, Type:02
    ]
    
  3. ID for a select box
  4. “idSelectRsnCd”


2. The function clear the select box to be re-constructed

function refreshCombo(dataList, comboId) {
   // Remove all current itmes
   $("#"+ comboId).children('option:not(:first)').remove();
   $.each(dataList, function(k, v) {
      // Get each key and value from the list
      var code = v.rtrnRsnCd;
      var val = v.rtrnRsnNm;
      $("#"+ comboId)
         // Set the key and value
         .append($("<option></option>")
         .attr("value",code)
         .text(val)
      );
   });
}

Step 2.1. At line 3, the select box with ID “idSelectRsnCd” is cleared
Step 2.2. At line 6 and 7, inside a loop, get key and value


3. HTML Option tag is created one by one (key and value)

function refreshCombo(dataList, comboId) {
   // Remove all current itmes
   $("#"+ comboId).children('option:not(:first)').remove();
   $.each(dataList, function(k, v) {
      // Get each key and value from the list
      var code = v.rtrnRsnCd;
      var val = v.rtrnRsnNm;
      $("#"+ comboId)
         // Set the key and value
         .append($("<option></option>")
         .attr("value",code)
         .text(val)
      );
   });
}

Step 3.1. At line 10 to 12, inside the loop, constructing HTML by setting the new value and key
Step 3.2. At line 8, the new HTML (with Option tag) is set to the ID “idSelectRsnCd

<form:select path="rtrnRsnCd" id="idSelectRsnCd" style="height:25px; width:200px">
    <form:option value="" label="--- Select Reason ---"/>
    <form:options items="${RSN_LIST}" itemValue="rtrnRsnCd" itemLabel="rtrnRsnNm"/>
</form:select>

Step 3.3. The second select box is re-constructed (ID:idSelectRsnCd)
dynamic-combo2

To Leverage On-Change Dropdown

dropdown-event1
In biz web apps, it is very common that the contents of select box is changed that triggered by other event. Such as select box generated upon other select box selected:
combobox2.2

Summarized as four parts

  1. Javascript (Ajax) is being called as a value is selected
  2. Ajax send a request to the controller method
  3. The controller create a list and send back JSON as a response
  4. Ajax receives the response (JSON) and construct a (second) select box

1. Javascript (Ajax) is being called as a value is selected

2015-05-23_19h54_26
The first select box contains this result (above)

<form:select path="rtrnTpCd" id="idSelectTpCd" onchange="onChangeTp();" style="height:25px; width:200px">
    <form:option value="" label="--- Select Type ---"/>
    <form:options items="${TP_LIST}" itemValue="rtrnTpCd" itemLabel="rtrnTpNm"/>
</form:select>

Step 1.1. As a value is selected, javascript function onChangeTp() is being called selected


2. Ajax send a request to the controller method

function onChangeTp() {
   var tpCd = $('#idSelectTpCd').val();
   $.ajax({
      type : "Get", 
      url : "onChangeTpCdRsnMain01",
      dataType: 'json',
      data : "tpCd=" + tpCd,
      success : function(data) {
         refreshCombo(data, "idSelectRsnCd");
      },
      error : function(e) {
         alert("error:" +response+ ":" +e);
      }
   });
}

Step 2.1. The Ajax send request with parameter to the controller method


3. The controller create a list and send back JSON as a response

@RequestMapping(value = "/onChangeTpCdRsnMain01")
public @ResponseBody List<RtrnRsnModel> refreshRsn(@RequestParam(value = "tpCd") String rtrnTpCd, Model model, HttpServletRequest req) {

	List<RtrnRsnModel> hdrStsList = RsnBL.getRsnsBoundTp(rtrnTpCd);
	model.addAttribute("rtrnTpCd", rtrnTpCd);
	req.getSession().setAttribute(CONST.TP_SELECTED.getVal(), rtrnTpCd);
	return hdrStsList;
}

2015-05-22_07h48_11
Step 3.1. The controller is being called, and following result will be set as result:
2015-05-22_07h34_46
Step 3.2. The controller method send the response (JSON)


4. Ajax receives the response (JSON) and construct a (second) select box

function onChangeTp() {
   var tpCd = $('#idSelectTpCd').val();
   $.ajax({
      type : "Get", 
      url : "onChangeTpCdRsnMain01",
      dataType: 'json',
      data : "tpCd=" + tpCd,
      success : function(data) {
         refreshCombo(data, "idSelectRsnCd");
      },
      error : function(e) {
         alert("error:" +response+ ":" +e);
      }
   });
}

Step 4.1. The Ajax receives a response and pass the result to the Javascript function “refreshCombo

function refreshCombo(dataList, comboId) {
   // Remove all current itmes
   $("#"+ comboId).children('option:not(:first)').remove();
   $.each(dataList, function(k, v) {
      // Get each key and value from the list
      var code = v.rtrnRsnCd;
      var val = v.rtrnRsnNm;
      $("#"+ comboId)
         // Set the key and value
         .append($("<option></option>")
         .attr("value",code)
         .text(val)
      );
   });
}

Step 4.2. At line 3, clear the select box to be re-constructed
Step 4.3. At line 10 to 12, inside the loop, constructing HTML by setting the new value and key
Step 4.4. At line 8, the new HTML (with Option tag) is set to the ID “idSelectRsnCd

<form:select path="rtrnRsnCd" id="idSelectRsnCd" style="height:25px; width:200px">
    <form:option value="" label="--- Select Reason ---"/>
    <form:options items="${RSN_LIST}" itemValue="rtrnRsnCd" itemLabel="rtrnRsnNm"/>
</form:select>

Step 4.5. The second select box is re-constructed (ID:idSelectRsnCd)

Closer detail of the Step 4, see Dynamically Creating a select box